The Ultimate Guide to Gutter Inspection Camera in the UK
If you are looking for a gutter inspection camera, the best option for most UK homeowners and tradespeople is a waterproof camera with its own screen that can be mounted on a telescopic pole, so you can check for blockages, leaks and damage from ground level without climbing a ladder. Based on our testing of standalone dual-lens inspection cameras, this approach is usually quicker, safer and easier to use in typical British weather than relying on a phone-only setup.
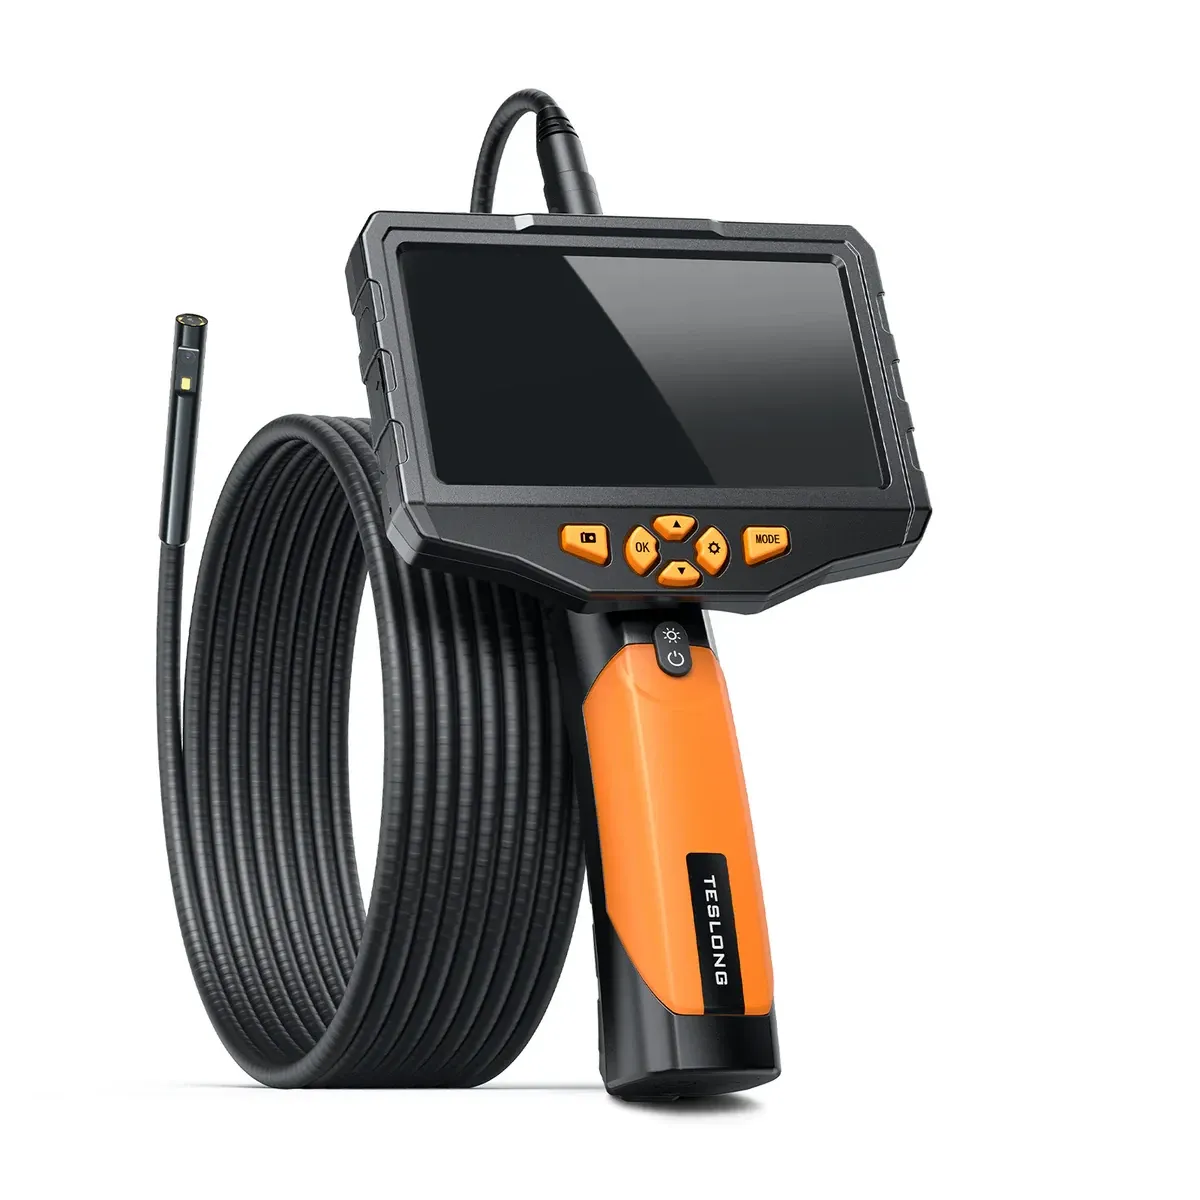
TL;DR: A gutter inspection camera lets you inspect gutters, downpipes and roofline details from the ground, which is especially useful on UK homes where moss, leaves and heavy rain often cause blockages. In practice, a standalone dual-lens camera with 1080p image quality, LED lighting and a waterproof probe gives the clearest view and avoids the hassle of balancing on ladders or using a mobile in wet conditions.
Moreover, using the right camera can help you spot early signs of overflow, standing water, cracked joints, loose brackets and plant growth before they turn into damp patches, stained brickwork or costly repairs. According to UK ladder safety guidance from the Health and Safety Executive (HSE), avoiding unnecessary work at height is always preferable where a safer method is available.
Why use a gutter inspection camera?
A gutter inspection camera is used to look inside or along roof gutters without having to climb up for a manual check. For UK properties, that matters because gutters regularly collect leaves, moss from roof tiles, silt, nesting material and general debris. Consequently, problems often build up unnoticed until rainwater starts overflowing.
Based on what we see most often on British homes, gutter inspections are especially useful for:
- Victorian terraces with narrow rear access
- Semi-detached houses with shared rooflines
- Detached homes bordered by mature trees
- Bungalows where long gutter runs are hard to view clearly from one angle
- Rental properties where routine visual checks save time before arranging cleaning or repair
In other words, the camera helps you answer a simple question quickly: is the gutter actually blocked or damaged? That means you can decide whether it needs cleaning, repair or no action at all.
What is a gutter inspection camera?
A gutter inspection camera is usually a compact waterproof borescope or snake camera attached to a pole or rod so it can be raised up to gutter level. The live image appears on either:
- a built-in screen on the device itself, or
- a connected smartphone via app or Wi-Fi.
For gutter work specifically, standalone models are often better suited because they are simpler to use outdoors. During real-world testing in changeable conditions, having an integrated display avoids app pairing issues, glare problems and awkward handling when your hands are already occupied with the pole.
A good gutter inspection camera normally includes:
- 1080p video resolution for clear viewing of debris and defects
- LED lights to illuminate shaded sections under roof edges
- IP67 or similar waterproof rating for damp environments
- A flexible yet robust probe
- A forward-facing lens, and ideally a side-view lens as well
- Photo and video recording for maintenance records or contractor quotes
Can you inspect gutters without using a ladder?
Yes, in many cases you can inspect gutters without using a ladder by attaching an inspection camera to a telescopic pole. This is one of the main reasons people search for a gutter inspection camera in the first place.
According to UK guidelines on working at height, it is better to avoid work at height where reasonably practicable. Therefore, if your aim is simply to check whether there is debris sitting in the channel or whether brackets have come loose, inspecting from ground level with a camera can be the safer first step.
This does not mean every job can be completed from below. If repairs are needed afterwards, safe access equipment may still be required. However, for diagnosis alone, a camera-on-pole setup often removes unnecessary climbing.
This is particularly helpful when dealing with:
- wet autumn conditions
- uneven drives or soft ground around garden borders
- conservatories beneath eaves
- rear extensions that make ladder placement awkward
- fragile areas near porches or outbuildings
What should you look for when choosing a gutter inspection camera?
If you want useful results rather than blurry footage and guesswork, several features matter more than others. Based on our testing of dual-lens standalone units for external property checks, these are the features worth prioritising.
Is 1080p good enough for gutter inspections?
Yes. Full HD 1080p is usually more than enough for inspecting household gutters. It gives enough detail to distinguish between loose moss, packed leaves, pooled water, cracked sealant joints and minor separations between fittings.
You do not normally need ultra-high resolutions for this type of task. What matters more is consistent focus, stable lighting and an easy-to-view screen outdoors.
Why is a dual-lens camera useful for gutters?
A dual-lens design is especially useful because gutters are awkward spaces to inspect with only one viewing angle. A front lens shows what lies ahead inside the run, while a side lens helps you see wall-side buildup, bracket positions and edge details that would otherwise be easy to miss.
This matters because many gutter issues are not directly in front of the probe. For example:
- a joint may be leaking at one side only
- silt may be building up against the back edge
- a support bracket may have shifted slightly downward
- a section may be holding standing water instead of draining properly
As a result, dual-lens viewing can reduce blind spots and speed up inspections.
Do you need a waterproof gutter inspection camera?
Yes. A proper waterproof rating is essential because gutters hold moisture even when they look dry from below. In the UK especially, drizzle, splashback and damp organic debris are normal conditions rather than exceptions.
An IP67-rated probe is typically suitable for this kind of inspection work. It helps protect the camera during contact with wet debris and shallow standing water.
Is a standalone screen better than using your phone?
For many users, yes. A standalone screen tends to be better outdoors because it removes dependence on mobile signal quirks, app stability and battery drain on your phone. In addition, it means one less device to protect from rain.
Based on our testing in real outdoor conditions, standalone cameras are often easier to operate when:
- wearing gloves
- working in light rain or mist
- using an extended pole overhead
- wanting quick start-up without pairing delays
This practical difference can matter more than people expect. On paper an app-connected model may seem convenient; however, when standing outside beneath trees with limited room and poor weather approaching, simple controls usually win.
How much cable length do you need for checking gutters?
The right length depends on how you plan to mount the camera rather than just how high your house is. For most domestic inspections using telescopic poles or attachment kits, enough cable should remain manageable while still allowing comfortable positioning at first-floor gutter level.
If there is too much unsupported cable dangling below the pole head it can become awkward in wind. Therefore it helps if the setup can be secured neatly while leaving enough flexibility at the top end for accurate aiming.
How do you use a gutter inspection camera safely?
The safest way to use a gutter inspection camera is from firm ground with the probe secured to an appropriate telescopic pole. Before starting, make sure overhead power lines are nowhere near your working area and avoid inspecting during high winds or heavy rain.
Step-by-step: how to inspect gutters from ground level
- Select dry enough conditions. Light cloud is ideal because harsh sunshine can create glare while heavy rain obscures visibility.
- Check your surroundings. Make sure footing is stable on paving or driveway surfaces.
- Attach the camera securely. Use suitable clips or brackets so the lens remains aligned as you raise it.
- Switch on the display before lifting fully. Confirm image clarity and LED brightness first.
- Raise the pole slowly. Position the lens just above or inside the gutter line depending on your angle of view.
- Sweep section by section. Inspect joints, outlets and corners carefully because these are common blockage points.
- Record photos or video. This helps if you later compare before-and-after cleaning results or seek repair quotes.
- Inspect downpipe entries closely.
Ready to upgrade your toolkit with DualLensIn?
Get Yours Now — £307.48